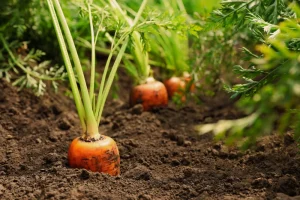


Cassava is a vital crop in Kenya, serving as a staple food and a source of income for many households. In 2018, cassava farming in Kenya produced approximately 946,000 metric tons of cassava, highlighting its significance in agriculture.
The crop’s resilience to drought and adaptability to various soil types make it particularly valuable in arid and semi-arid regions. It contributes to food security by providing a reliable source even under challenging climatic conditions.
Economically, cassava farming offers income-generating opportunities for smallholder farmers. For instance, in Makueni County, farmers participating in cassava commercialization programs have reported improved incomes and enhanced food security.
Despite its potential, Kenya’s cassava production faces challenges, including lower yields than other countries. Addressing these challenges through improved farming practices and value chain development could enhance cassava’s role in bolstering Kenya’s food security and economic growth.
How to Plant Cassava
Planting cassava properly is critical to achieving optimal yields and ensuring the sustainability of your farming venture. Below is a detailed step-by-step guide to planting cassava effectively.
Land Preparation
Importance of Selecting Well-Drained, Fertile Soils
Cassava thrives best in well-drained, fertile soils with a pH of 5.5–7.5. Poorly drained soils can lead to root rot, significantly reducing yields. The soil should also be rich in organic matter and free of toxic substances. Fertile soils support robust root development, vital for the crop’s overall productivity.
Steps for Clearing, Tilling, and Leveling the Land
- Clearing the Land: Remove all weeds, shrubs, and plant debris from the area. This minimizes competition for nutrients and prevents pests and diseases.
- Tilling: Plow the land to a depth of 20–30 cm to loosen the soil. This improves root penetration and aeration. In large-scale farming, mechanized tillers can be used for efficiency.
- Leveling: After plowing, level the soil to create a uniform planting surface. This ensures even water distribution and simplifies subsequent farming activities.
Planting Techniques
Choosing Quality Cassava Stems for Planting
Select healthy, mature stems from high-yielding, disease-resistant varieties. The stems should be 8–12 months old, free of visible damage, and have well-developed nodes.
- Cut the stems into 20–25 cm pieces, ensuring each piece has 5–7 nodes.
- Avoid using stems with signs of disease or pest infestation, as they can spread to the entire crop.
Recommended Spacing for Optimal Growth
Proper spacing ensures sufficient room for root expansion and access to sunlight, critical for photosynthesis. Use the following guidelines:
- Spacing: Maintain a distance of 1 meter between rows and 1 meter between plants within a row. This spacing allows for 10,000 plants per hectare.
- Adjust spacing based on the variety and intended use (e.g., higher density for leaves versus roots).
Best Planting Depth and Orientation of Cuttings
- Planting Depth: Insert the cuttings into the soil at a depth of 5–10 cm. Avoid planting too deep, as this may hinder sprouting.
- Orientation: Place the cuttings at an angle of 45 degrees or horizontally. Ensure at least two nodes are buried in the soil while one remains above ground to facilitate sprouting.
Seasonal Considerations
Ideal Planting Seasons in Kenya
In Kenya, the best time to plant cassava is at the beginning of the rainy season, typically between March and April for the long rains or September and October for the short rains. These periods ensure that young plants receive adequate moisture during their initial growth.
Importance of Timing in Achieving High Yields
Planting at the right time is essential to align the crop’s growth cycle with favourable weather conditions. Early planting within the rainy season maximizes water availability, promotes uniform germination, and reduces water stress during critical growth stages. Late planting can expose the crop to drought and pests, lowering yields.
Cassava Farming Guide
Cassava farming is an important agricultural activity that supports livelihoods and food security, particularly in regions with challenging climatic conditions. Successful cassava farming requires understanding the crop’s specific requirements and implementing effective management practices to ensure optimal yields.
Climatic and Soil Requirements
Overview of Ideal Climatic Conditions for Cassava Growth
Cassava is highly adaptable and thrives in tropical and subtropical climates. The crop performs best in regions with temperatures ranging from 25°C to 35°C and an annual rainfall of 1,000 to 1,500 mm.
While cassava is drought-tolerant, consistent rainfall during the early stages of growth is crucial to establish healthy plants. Similarly, extended periods of drought, however, can adversely affect root development and yield.
The crop also benefits from adequate sunshine for photosynthesis, making it suitable for Kenya’s arid and semi-arid regions.
Soil pH, Texture, and Fertility Needs
The ideal soil for cassava cultivation is well-drained, sandy loam or loamy soil. Clay-heavy soils are less suitable because they retain water, increasing the risk of root rot. Cassava grows best in soils with a pH range of 5.5 to 7.5.
Acidic or highly alkaline soils can limit nutrient availability and impede root development. Fertility is another key factor, as cassava requires adequate nitrogen, potassium, and phosphorus. Incorporating organic fertilizer improves soil structure and fertility, promoting robust growth.
Crop Management
Importance of Weeding and Mulching
Weeding is critical in cassava farming, especially during the first three months after planting. Neglecting weeding can significantly reduce yields, as weeds compete directly with cassava plants. Regular manual or mechanical weeding ensures a weed-free field, supporting healthy crop growth.
Mulching is another effective management practice. Applying a layer of organic material, such as dry leaves or grass, around the base of the plants helps conserve soil moisture, suppress weeds, and regulate soil temperature.
Mulching also prevents soil erosion, which is particularly beneficial in sloped fields.
Pest and Disease Control
Cassava is susceptible to several pests and diseases, with cassava mosaic disease (CMD) and cassava brown streak disease (CBSD) being the most destructive.
CMD is caused by a virus that causes stunted growth and malformed leaves, while CBSD affects the roots, causing rot and rendering them unmarketable.
These diseases are primarily spread through infected planting materials and whiteflies.
Farmers should plant disease-free cuttings sourced from certified suppliers to control pests and diseases. Rotating crops and using resistant varieties also minimize the risk of disease outbreaks.
Additionally, whiteflies and other pests can be managed through integrated pest management (IPM) practices, such as introducing natural predators or applying eco-friendly insecticides.
Cassava Harvesting Best Practices
Signs of Maturity and Ideal Harvesting Time
Cassava typically matures within 8 to 12 months after planting, depending on the variety and growing conditions.
The signs of maturity include yellowing of the lower leaves and thickened roots. In some cases, farmers can gently dig around the base of the plant to assess root size before deciding to harvest.
Harvesting too early can result in underdeveloped roots with low starch content, while late harvesting increases the risk of root deterioration. Timing is crucial to maximize both the quantity and quality of the yield.
Methods to Harvest Cassava Roots Without Damage
Harvesting cassava involves uprooting the plant carefully to avoid damaging the roots. Farmers can loosen the soil around the plant using a hoe or fork and then pull the plant from the ground.
In larger farms, mechanized equipment may speed up the process. After harvesting, the roots should be handled gently to prevent bruising, as damaged roots spoil quickly. Proper post-harvest handling is essential for quality, mainly if the cassava is intended for market sale.
Popular Cassava Varieties Grown in Kenya
In Kenya, agricultural research institutions have developed and promoted several cassava varieties. These varieties meet the growing demand for high-yielding, disease-resistant, and drought-tolerant crops.
Below are five popular cassava varieties grown in the country and their notable traits:
KME 1 (Kenya Agricultural Research Institute Mtwapa Early 1)
This is one of the most widely grown varieties due to its high yield potential and early maturity, taking about 8–10 months to reach harvest.
KME 1 is highly resistant to cassava mosaic disease (CMD), making it suitable for regions prone to disease outbreaks. It is also drought-tolerant, thriving in Kenya’s arid and semi-arid lands.
Kibandameno
A traditional variety that remains popular in coastal regions, Kibandameno is valued for its sweet taste and adaptability to low rainfall areas. While its yield potential is moderate compared to improved hybrids, it naturally resists some pests and diseases. Farmers favour it for home consumption and local markets.
TME 14 (Tropical Manihot Esculenta 14)
This is known for its exceptional resistance to cassava brown streak disease (CBSD); TME 14 is a preferred variety in disease-prone areas. It produces high-quality, starch-rich roots ideal for industrial use and processing. TME 14 also demonstrates good drought tolerance, making it suitable for regions with erratic rainfall.
MH95/0183
This improved variety is popular for its high starch content and robust resistance to CMD and CBSD. It has a relatively short maturity period of 9–12 months, making it an attractive option for farmers looking to maximize returns quickly. MH95/0183 performs well in high- and low-rainfall areas, demonstrating excellent adaptability.
Fumbina
A variety introduced through regional trials, Fumbina is appreciated for its high yields and drought resilience.
It matures within 10–12 months and has a low susceptibility to pests like mealybugs and whiteflies. Fumbina is increasingly grown in Kenya’s western regions, supporting household consumption and commercial ventures.
Safi Biochar Ammender: A Game-Changer for Cassava Farming
Deacidifying the Soil
Safi Biochar Ammender is a soil amendment product derived from organic waste materials such as rice husks. This process creates a stable form of carbon-rich material known as biochar, which can neutralize acidic soils.
Soil acidity is a significant challenge in many cassava-growing regions of Kenya, as it limits the availability of essential nutrients such as phosphorus and calcium.
Raising the soil’s pH to optimal levels (5.5–7.5 for cassava), Safi Biochar Ammender creates a more hospitable environment for root growth and nutrient absorption.
Improving Soil Structure and Fertility
One of the standout benefits of Safi Biochar Ammender is its ability to enhance soil structure. The porous nature of biochar improves water retention and aeration, preventing waterlogging while ensuring that the roots have access to adequate moisture during dry spells.
Additionally, the product acts as a reservoir for nutrients, gradually releasing them into the soil. This ensures that cassava plants receive a consistent supply of vital nutrients throughout their growth cycle.
Boosting Microbial Activity
The application of Safi Biochar Ammender encourages the proliferation of beneficial soil microorganisms. These microbes play a crucial role in nutrient cycling, breaking down organic matter into forms that plants can absorb.
Enhanced microbial activity leads to improved nutrient availability and overall soil health, directly translating to higher cassava yields.
Reducing the Need for Synthetic Inputs
Safi Biochar Ammender reduces the reliance on synthetic fertilizers, which can be expensive and harmful to the environment if overused. By naturally enriching the soil, this organic amender allows farmers to achieve sustainable productivity while cutting input costs.
For cassava farmers, this means better profitability and a more eco-friendly approach to agriculture.
How to Increase the Shelf Life of Cassava After Harvesting
Cassava roots have a very short shelf life once harvested, typically lasting only 24–72 hours before they begin to deteriorate. This post-harvest deterioration is caused by enzymatic reactions and microbial infections, which lead to spoilage and loss of market value. However, several methods can be employed to extend cassava’s shelf life and reduce post-harvest losses.
1. Proper Harvesting Techniques
Proper harvesting methods can reduce initial damage to the cassava roots, accelerating deterioration. Harvest the roots carefully to avoid bruising, cuts, or scratches. Damaged roots are more prone to microbial invasion and enzymatic activity, which hastens spoilage.
2. Immediate Post-Harvest Handling
After harvesting, roots should be handled with care to minimize physical damage. Clean the roots gently to remove the soil without bruising the surface. Avoid stacking cassava in large heaps, as this can generate heat and promote spoilage.
3. Waxing the Roots
Applying a thin layer of wax to the cassava roots is an effective method to extend shelf life. The wax acts as a barrier, preventing water loss and oxygen entry, which slows enzymatic reactions. Waxing can extend the shelf life of cassava to about 2–3 weeks under ambient conditions.
4. Storing in Moisture-Controlled Environments
Cassava roots deteriorate rapidly due to dehydration. Storing them in conditions that maintain high humidity (70–80%) can significantly slow drying. For example:
- Burying the roots in moist sand can preserve their freshness for up to two weeks.
- Wrapping roots in perforated polyethene bags can maintain moisture levels and extend shelf life.
5. Cold Storage
Refrigeration can slow enzymatic activity and microbial growth, effectively extending the shelf life of cassava roots. Store cassava at 0°C and 4°C to maintain quality for 2–3 weeks. However, this method may not be feasible for smallholder farmers due to high energy costs and limited access to cold storage facilities.
6. Processing into Storable Products
Processing cassava into more stable products is a long-term solution to post-harvest losses. Some common methods include:
- Drying: Cassava can be sliced into chips or grated and dried in the sun or in mechanical dryers. The dried product can be stored for months without spoilage.
- Fermentation: Turning cassava into fermented products like gari or flour can extend its usability significantly.
- Freezing: Peeled and chopped cassava can be frozen for several months, requiring access to reliable freezing facilities.
7. Chemical Treatments
Treating cassava roots with safe chemical preservatives, such as sodium metabisulfite or chlorine-based solutions, can inhibit microbial growth and enzymatic activity. This method is often used in commercial settings to extend shelf life by several weeks.
In conclusion, Cassava farming in Kenya holds immense potential as both a reliable source of food security and a profitable agricultural venture. Its ability to thrive in diverse climatic conditions, including arid and semi-arid regions, makes it a vital crop for addressing food shortages and providing livelihoods to countless farmers.
Cassava farmers must adopt sustainable practices, such as using organic fertilizers like Safi Biochar Ammender. Other practices include embracing improved disease-resistant varieties and implementing proper post-harvest management techniques.